“Bikablorize” Images – A Guide to Creating Visuals in Five Simple Steps

“As a child, I only ever drew what was important.” This statement was shared by one of our training participants and is a reminder for us of “the wisdom that is in children’s drawings”. In this little tutorial, we’ll show you how you can use this mindset and the bikablo technique to simplify your own pictures to the essential elements and thus “bikablorize” them.

by Martin Haussman

SHARE ARTICLE

The rudimentary bull and the technique of simplification

Do you know the famous drawing by Pablo Picasso, in which the legendary Spanish artist reduced a detailed bull to a simple line drawing in eleven steps? At the beginning of this series, there is an anatomically correct sketch, which is depicted in an increasingly simplified way in each subsequent step. In the end, what remains is a pictogram consisting of simple lines and shapes, in which every viewer – despite the captivating simplicity – still recognizes a bull.

At bikablo, we also use this technique of simplification in our training and for our graphic recording work. This allows us to quickly and flexibly draw from a wide range of images and simply depict complex shapes with just a few strokes.

If we lack the right images for a quick sketch, we can develop them ourselves quickly and easily using our visual vocabulary. We call this process “bikablorizing images”. Anyone can learn to do this, because this special technique uses mainly letters and simple graphic shapes: dots, lines, circles, triangles or squares.


“Perfection is reached, not when nothing more can be added, but when nothing more can be taken away.” – Antoine de Saint Exupéry

“Bikablorize” Images – A Guide to Creating Visuals in Five Simple Steps

Stroke by stroke you can draw a horse – bikablorize images in five steps.

Letters and simple geometric shapes are very easy to trace. This makes them ideal to use in building visual vocabulary with bikablo technique. For example, if you want to draw a horse using the bikablo approach, do the following:

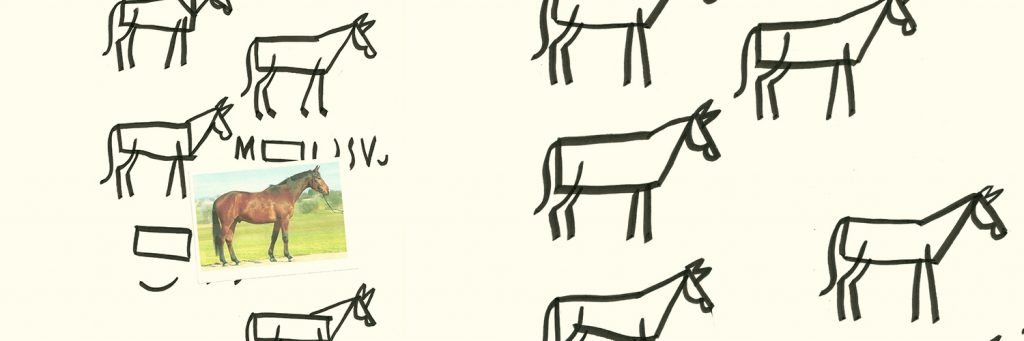
1. Find yourself a simple template , perhaps look for a picture on Google Image search. Try to identify the simplest shapes in the image and – like Picasso – break it down into its basic forms. Where can I leave out another line, where not? Where are proportions important?
Abstrakte Zeichnung einer Person mit einem Dokument oder einem Blatt Papier, nach oben zeigenden Pfeilen und fliegenden Vögeln. Oben links ist auf orangefarbenem Hintergrund der Text „VF-CURRICULUM“ zu sehen.

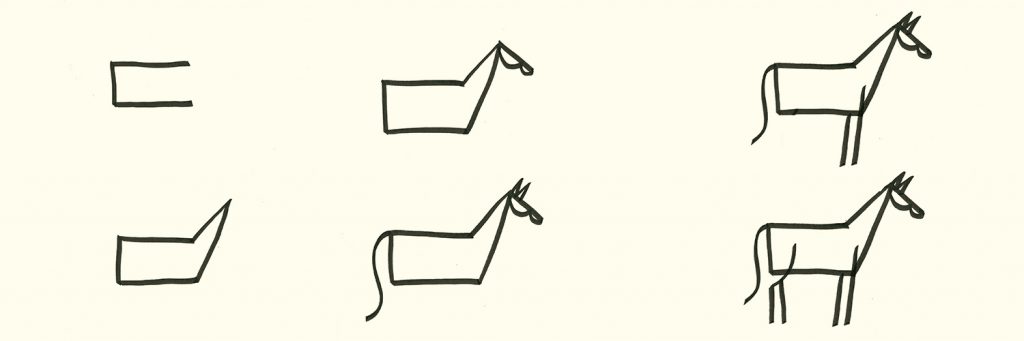
2. Decide on a version in which – according to de Saint Exupéry’s quote – nothing can be left out. Make yourself aware of the basic shapes once again.

Illustration einer Person, die auf eine Tafel mit Sprechblasen und einem Venn-Diagramm zeigt. Links ist die Aufschrift „VF-CURRICULUM“ zu sehen. Der Hintergrund ist orange.

3. Draw the horse step by step, starting with the largest shape, in this case the torso. Memorize the order of the strokes, connection points and the proportions. Practice putting together the individual shapes and components until you can draw the picture “horse” as fluently as you write the word.
Ein Mann steht vor einer mit Notizen bedeckten Weißwandtafel und erklärt einer Frau etwas, die ihm in einem hellen Raum mit großen Fenstern aufmerksam zuhört.

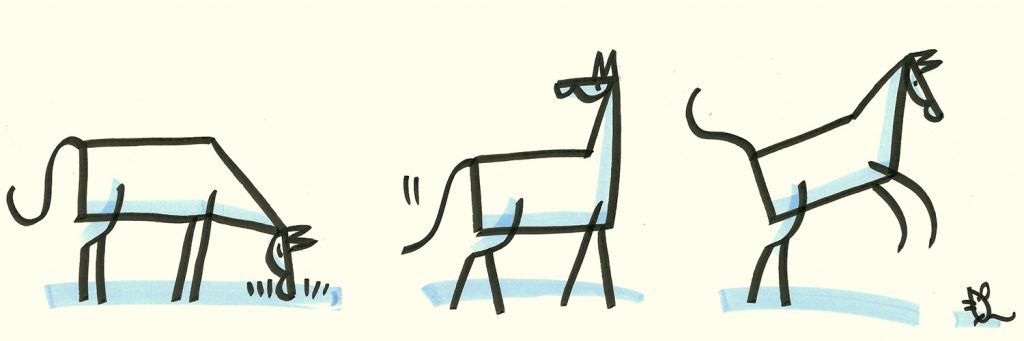
4. Finally, use a light, wide colored pencil to create a shadow . This gives the drawing body. Note how and where you placed the shadow.

Eine Frau steht vor illustrierten Whiteboards und erläutert visuelle Notizen zum Thema Prozessberatung. Auf den Tafeln sind handgeschriebene Texte, Diagramme und farbenfrohe Zeichnungen zu sehen, die sich auf die Prozessvisualisierung beziehen.

5. Now that you have mastered your image and its components, you can begin to play with it. Often, simple changes in stroke direction or arrangement are enough to create new visual expressions.
Eine handgezeichnete Mindmap auf Deutsch mit Skizzen, Pfeilen und Kreisen behandelt Herausforderungen und Tipps zur Erstellung visueller Zusammenfassungen, zur Layoutplanung und zur Textverständlichkeit; dabei kommen violette, orangefarbene und schwarze Tinte zum Einsatz.

MORE ARTICLES ON THIS TOPIC

You Might Also Be Interested In...

sharing iPad screen in MS Teams using CamLink and OBS

How to use your iPad instead of the webcam in MS Teams

Why do I want to connect the iPad to MS Teams (or Zoom)?
I would like to be able to show my iPad Screen as a tile in the normal Teams window. It should be subtle and not by sharing my screen to draw to much attention and to have a seamless switch between different views. I can i.e.
• document the meeting using OneNote or ProCreate
• easily zoom into pictures or drawing
• easily annotate pictures or digital whiteboards
• using the drawing feature while presenting your content